
Password: TheMill
Final Touches
Some of the few changes I made since last week were the lightning and how thin and bright it is, the brightness of the ground where the lightning shines on it, the tail lights, and we also added fog to the headlights after Billy suggested it in an email.
For the lightning, David was able to cache out a thinner version of the lightning that allows you to see more of the detail in them. Then I also used a different method to render the lightning passes out. Before I was turning them into mesh lights and just rendering those out. This time I put a white shader on it and a dim white sky dome, so you will be able to see the detail in the lightning even more.
For the lightning shining on the ground, I also put a white shader on the ground and the increased the intensity of the meshlights in that layer so it was more than just an occlusion pass of the lightning near the ground. I also changed the way I did the tail lights as well. It is still using a meshlight like I was before, but I turned the visibility off of the light so it is emitting light but not visible. So now the tail light is less of a solid red and has more depth and variation from the refraction of the red plastic cover.
Fine Tuning
For shot 2 and 3 we did a little bit of adjusting of the positioning of the cars in the frame. For shot 2, we realized that the car was a lot bigger in the scene that what it looked like in the reference photos we took on the day we filmed our plates. Below is the image we took as reference on the day of shooting, as well as the new position in our updated shot 2.
For shot 3, we got rid of the animation of the car sliding in, and they are now just sitting static in the frame emulating the end beauty shot that a lot of car commercials finish with. We re-positioned the cars in frame a little bit to fit the scene better. We also scaled down the cars in this shot too because we again realized they were much too large in relation to the size of the road. Below is the reference image we took on the day of shooting next to our updated shot 3. I am also including reference images of car commercials we used to model this shot after
Headlights and Tail Lights
Some of the last details I added to our scene that I think helped bring it to another level were the headlights and tail lights on the car. The tail lights were part of the fill layer and the headlights were on their own layer so we could have more control over them in post. We also have a layer in Shot 3 where the headlights from the car on the right is shining onto the car on the left.
I looked at a lot of reference to see what these lights look, especially in darker lighting. The headlights have two main parts to them, an outer ring around the whole headlight glows as if a bright reflector, and then the actual light bulb inside. I used the geometry of the car and turned it into a mesh light for the out part, and then used a point light for the bulb. I don't want the headlights to get blown out, so I was careful in how bright they got. Below are some of the main references I used to create them.
The red tail lights were a little more difficult. In real life, the actual lights aren't red, but the red plastic reflectors that it is shining through is what is making it red. So I kept this in mind when making the lights and tried to recreate this. I also wanted to make sure that the tail lights didn't look too much like brake lights because that wouldn't make sense when it is driving down the road, so I wanted to avoid that. I tried to balance the brightness, and then allow there to be a little bit of glow effect in the compositing. Below are the images I used for reference.
These two images are what the headlights and tail lights look like in our shots. I think the headlights could be toned down a little bit because they are getting a little bit too blown out. Another thing we need to add to the scene is the headlights shining on the ground.
Integrating the Lightning
During yesterday's session with the Mill, Billy suggested getting rid of the extra light because the shadow on the ground doesn't really make any sense with the sunset/dusk sky that we have now. He also suggested that we should have a lot of the lighting in our scene come from the lightning itself. It will be tough be should look great if we can pull it off.
So after this new direction, we wanted to get a test of it done as soon as possible to see how it will work. David gave me some test geometry of the lightning from Houdini and I began setting up the render layers. I have a "beauty" layer for the lightning bolts themselves, a layer of the light emitting onto the car like a key light would, a layer for the reflections in the car, and a layer for the light emitting into the ground. I have two sets of lightning bolts, one set used for the beauty layer of the actual bolts, and another set that emits the proper amount of light. I found that the more I increase the exposure and intensity of the lightning to properly light the ground and car, the bolts were grounding in size and losing detail because they were so bright. So I separated the two purposes so we can have as much control as possible. As for the light emitting onto the ground, I actually used an ambient occlusion shader on the ground with the lightning bolts visibility turned off. I found that it was giving me the same shape and values as when I was lighting it in the masterlayer. So we will use the occlusion as a way to bright light onto the ground instead of a shadow.
Beauty layer of the lightning bolts
Key Light onto the car
Lightning bolt reflections into the car
Occlusion as the light emitting onto the ground
Below is the composite that Abby did to test how these are working so far. There is still tweaking to be done but I think it is working well so far!
The next step for me is to figure out how to do the headlights and the tail lights. I know that we discussed before with Kyle that we might be able to get away with not having them on, but our lighting has changed significantly now and it looks strange to me that the scene is so dark but that are not on. I will find more reference to see how these Tesla lights look when they are and start testing that.
Below are some reference images of the look of the lightning.
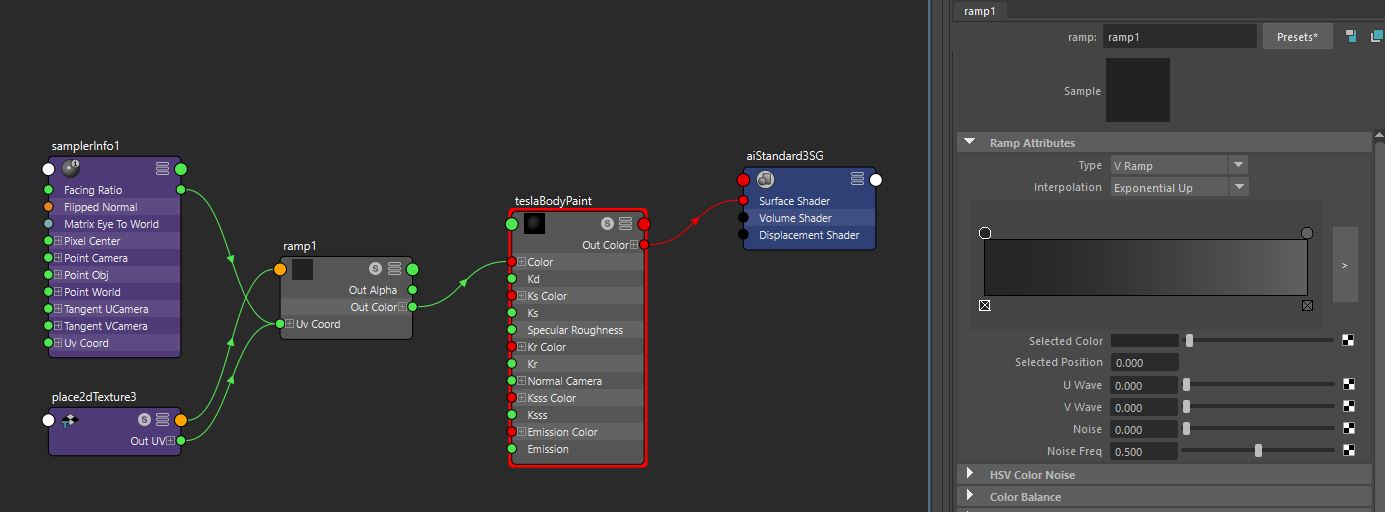
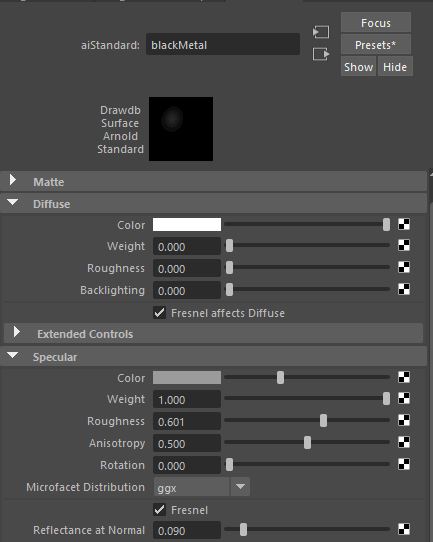
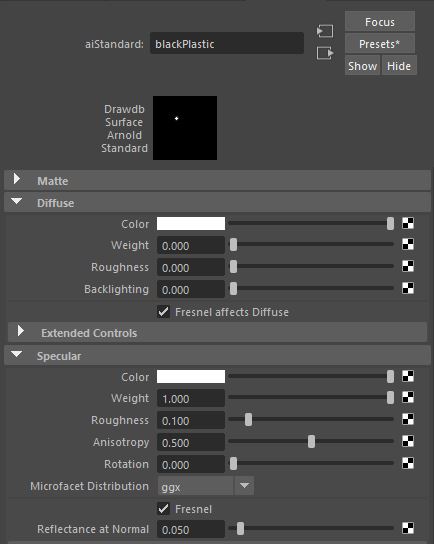
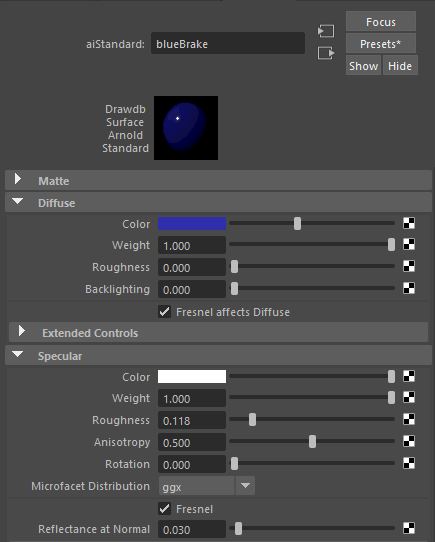
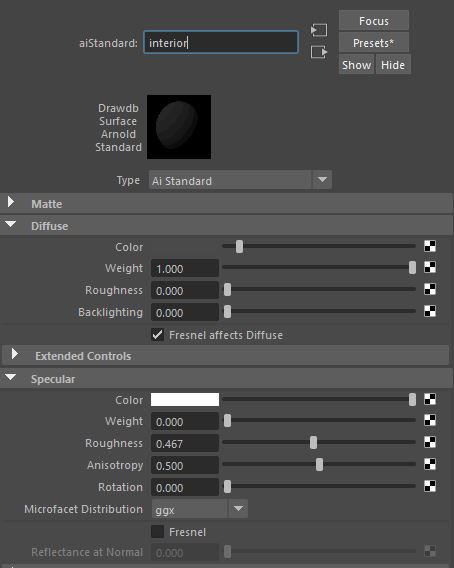
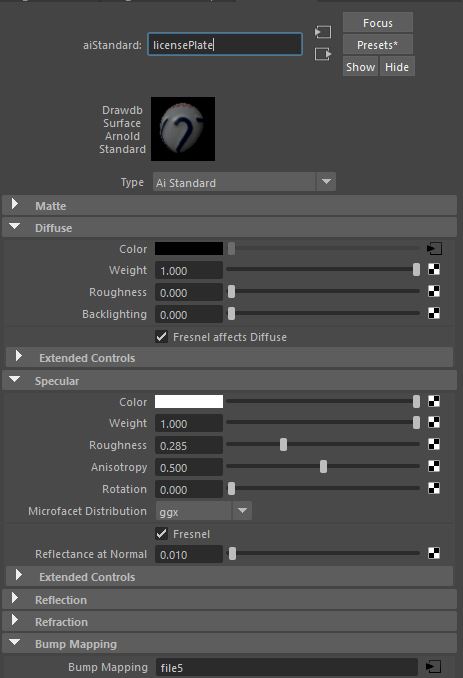
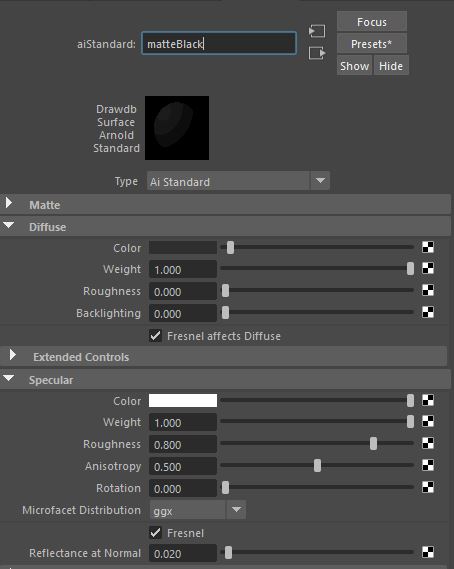
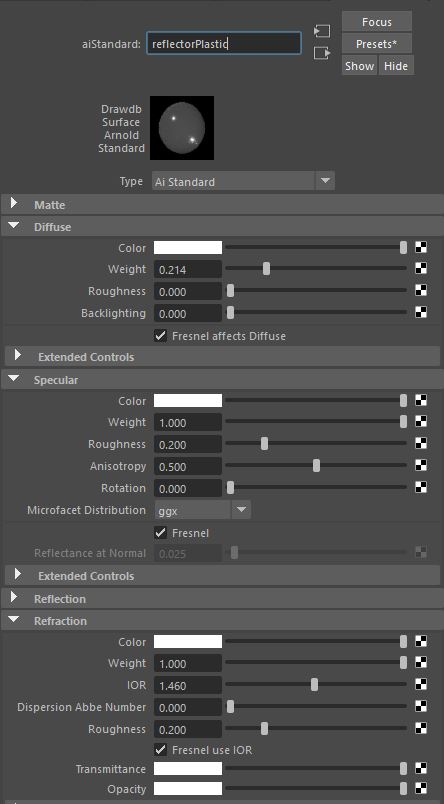
Tesla Shader v02
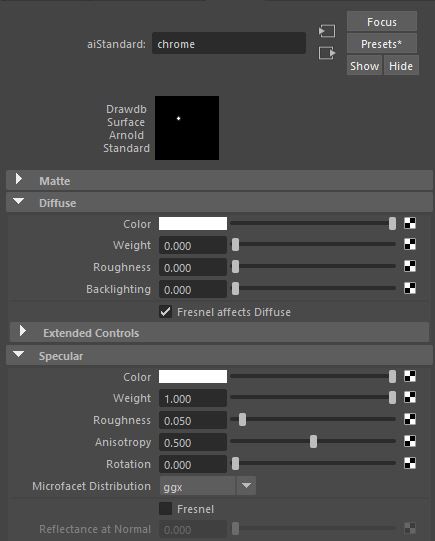
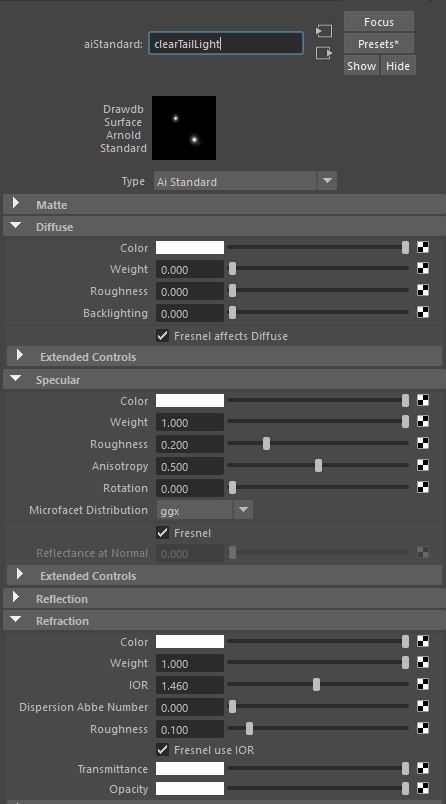
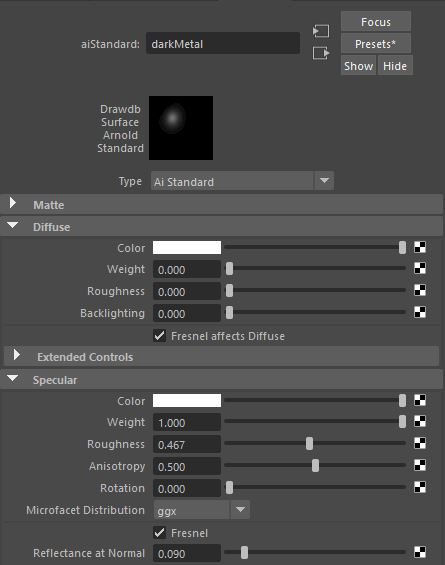
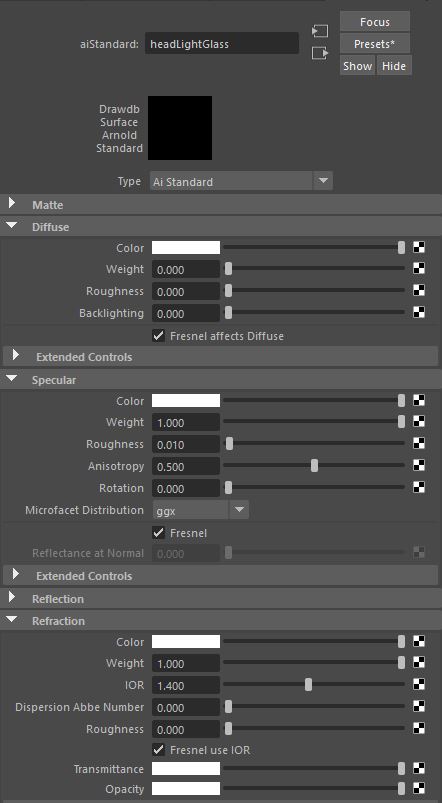
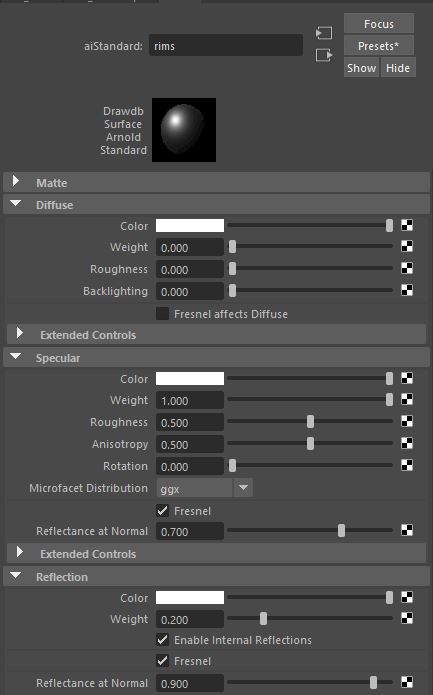
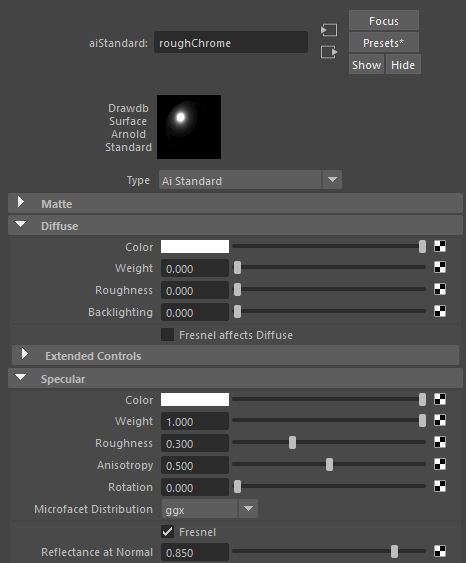
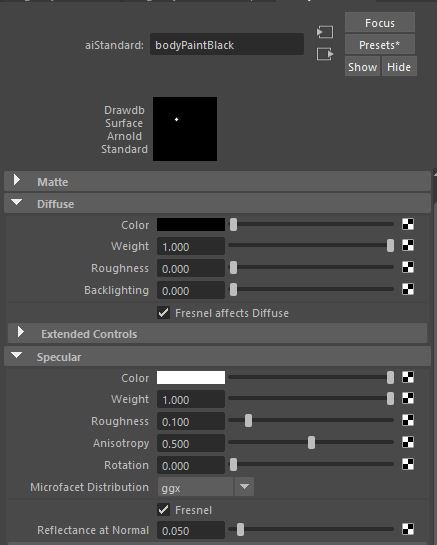
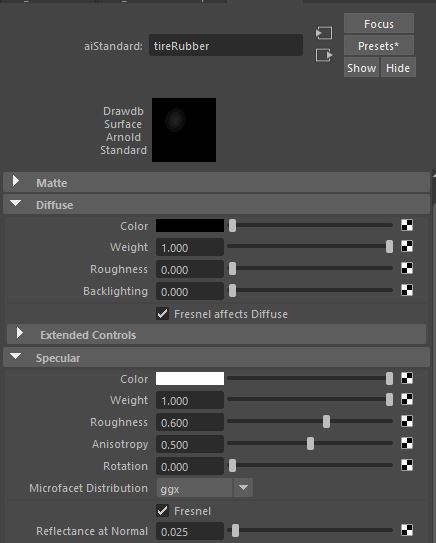
Some of the major updates to my car shader since last week were making the rims feel more like aluminum, the tire rubber, making the windows more tinted, making the chrome trim less perfectly reflective, and adjusting the materials in the headlights. I also added all the reference shaders spheres of each material into the turntable.
Below are the settings for each shader used on the car.


Animating Shot 3
All three of our shots in this commercial have the car moving, two of them are pretty straight forward, essentially just driving straight down the road. Shot 3 is a little more complex, with the main car sliding into place next to the second car, to end the commercial with a beauty shot of the two Teslas sitting on the road. When looking for reference for how the car would slide into place, we wanted something that was more of a "coming to a screeching halt" rather than a drifting maneuver from a racing car or something.
The video above is the result of my first pass at animating the car sliding into place. I wanted to keep the motion somewhat subdued and didn't want it to look like reckless driving or as if the car was about to smash into the other car. But when I came back to it after a day, it looked too slow and not exciting enough. This was suppose to be a exciting and elegant commercial to show off this beautiful car, and this wasn't doing it.
After a few more iterations, this is where the animation is at right now. It is a lot more exciting and fast than it was before. One of the challenges was balancing and timing the rocking motion when the car came to a stop. The amount the weight shifted would depend on how fast the car was going and how much momentum it had, so that took a longtime to get it to look right.
First Pass at Shading the Tesla
When deciding the colors we were going to use for our two Tesla cars, we looked at their website to see what colors they manufacture. They use mostly neutral colors which is perfect for us because that is the color palette we were going for originally anyway. We wanted something sleek and elegant but wouldn't be too distracting or take over the scene. We wanted to also tie into the lightning effects as well, so one of the cars will be a darker blue, and Abby will be shading that car. The other car will be a dark grey or "midnight silver metallic" as Tesla says on their website, and I am shading that one. This was our favorite option from the beginning so it will be the one that we follow throughout the commercial.
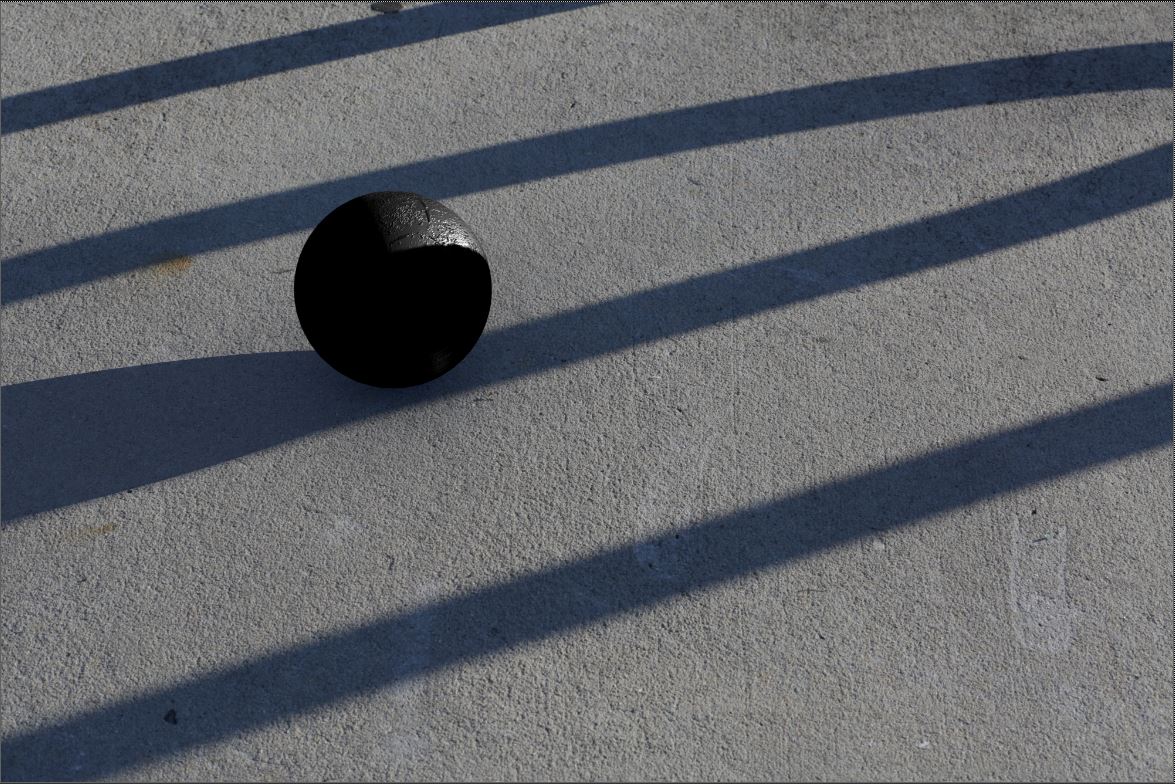
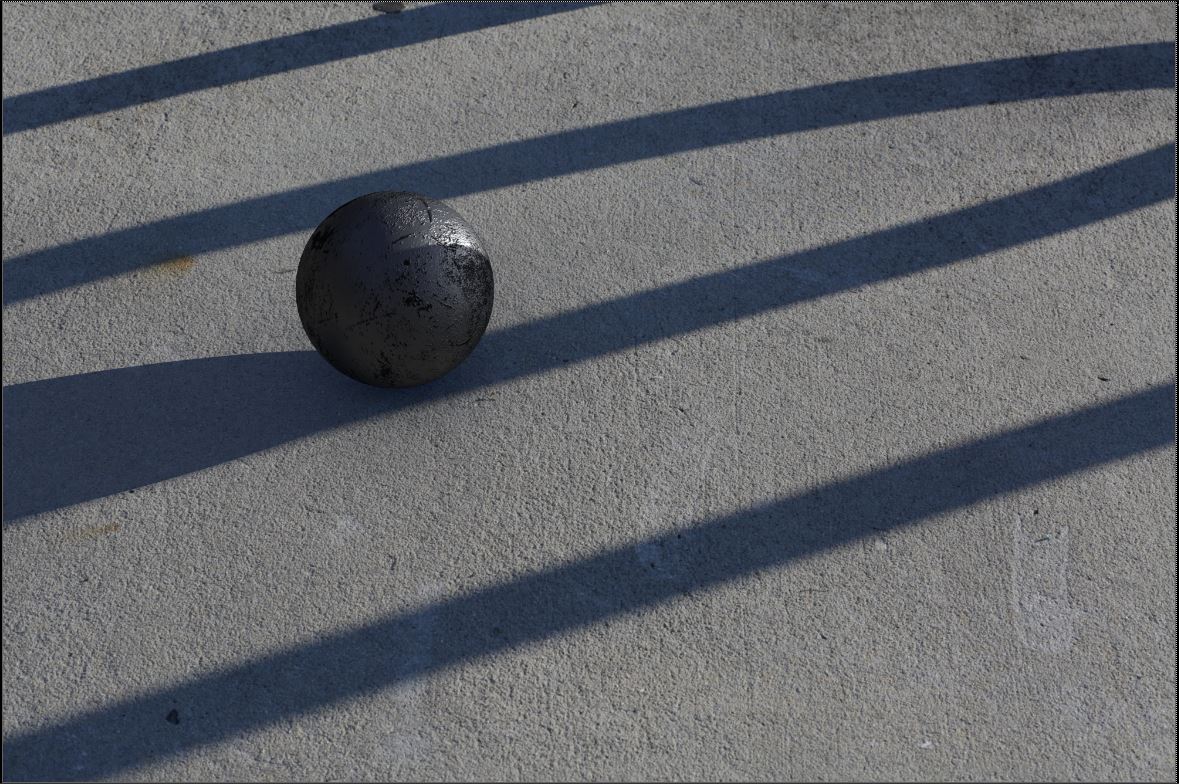
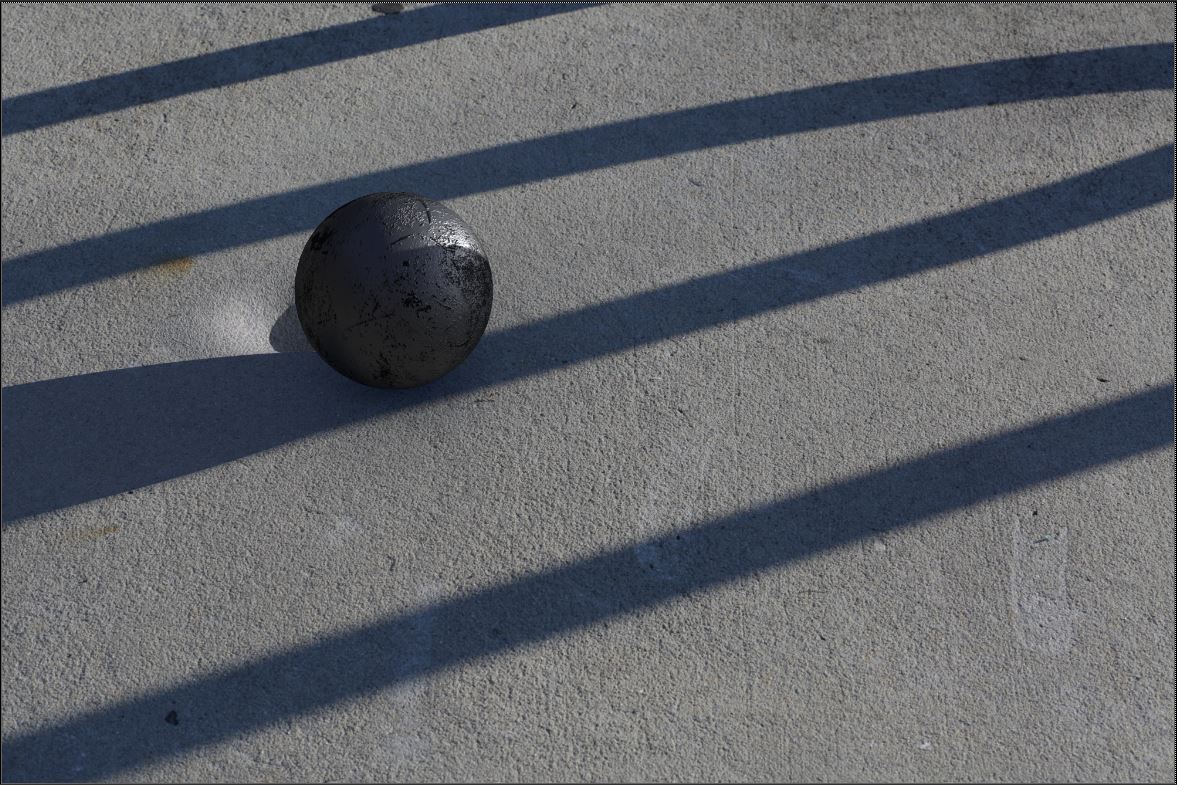
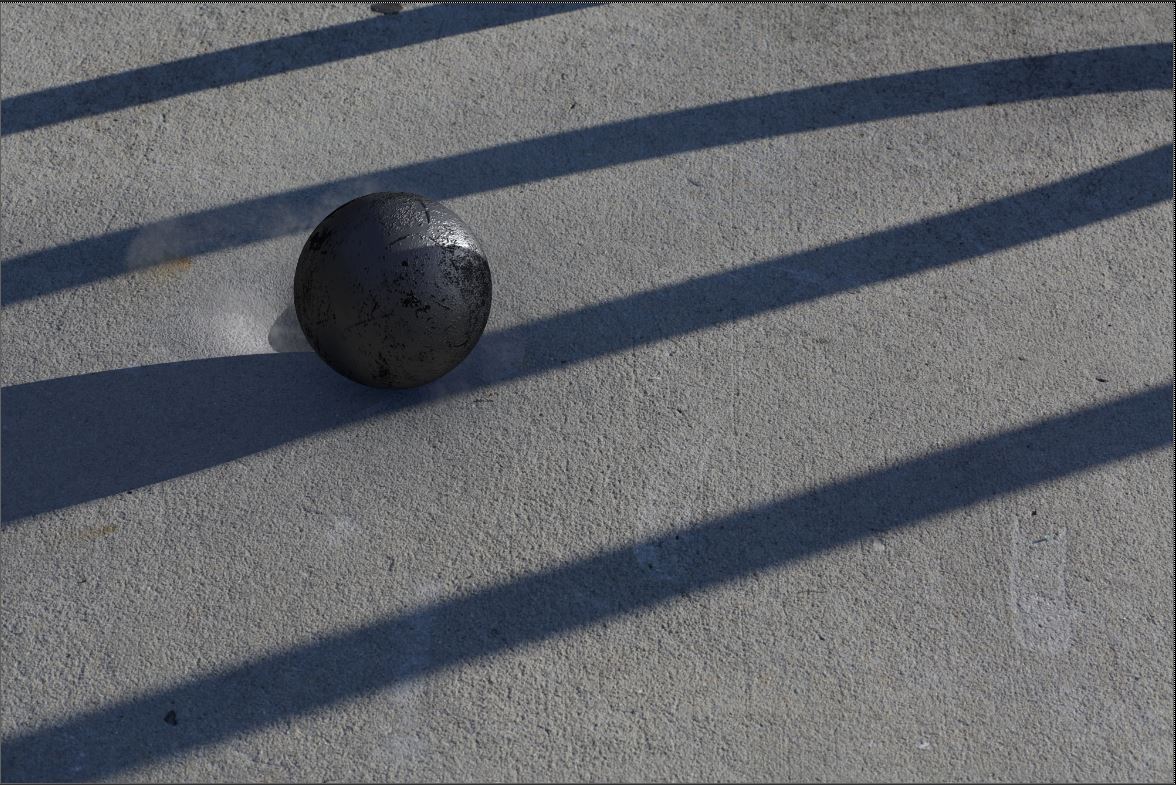
This video is the final comp with the adjustments I made to the shadows, shader, and motion blur along with the new ball animation, ground dent, and dust effects I received from my partner.
The video above is a final comp of a rolling ball animation I did myself because the new animation I received for this session did not travel through the whole frame. I felt that I needed to see the full effect of my light and shadow on a longer and slower animation. I made the ball slightly bigger as well so it was easier to see the details in my new shader and how it reacts with the environment.
Nuke tree for updated comp
Week 4: Updates to Project 1
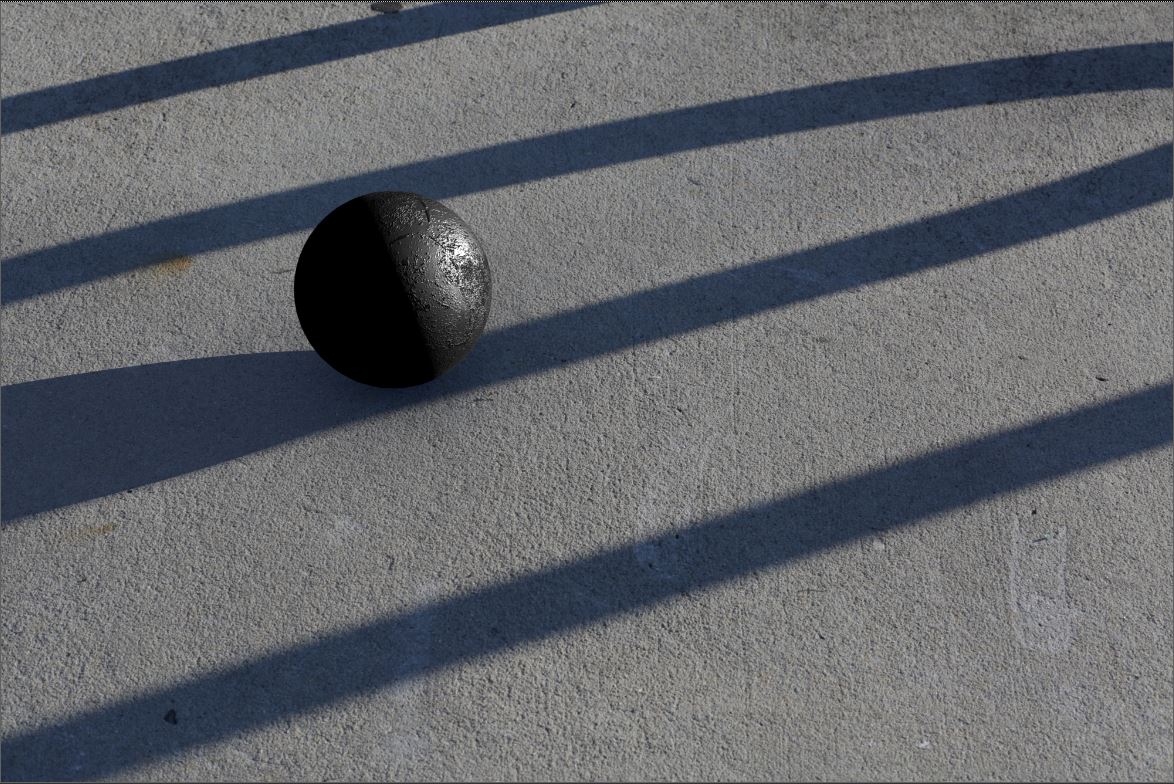
The feedback I got for my portion of Project 1 from last week's session was to fix the shadows on the ball so they aren't as black and match better with the shadows in the background plate, add some dust to my shader on the cannonball so it looks like it belongs with the background and the dust effect, soften the edge of the shadow on the ground a bit, and add motion blur.
The above picture in the left is my grey ball match compared to the photo I took as part of the set. I adjusted the shadow radius a little bit to soften it as it got longer, but I didn't want to push it too far because the shadow is quite sharp in the reference photo.
The video above is a turntable of my updated shader. I added a layer of dust and tried to match the color of the cement in the background plate so it feels like it belongs in this setting. I also adjusted the amount of bump in each layer of the shader as well: the shiny metal, the dust, and the dark rough metal.
Week 3: Comping Project 1
After taking my new photos for the background plate for this project, I re-matched the camera and the lighting, I applied a material to the ball to resemble a cannonball and set up all my render layers to prep for comping it all together. The layers included the key light, fill light, key light shadow, occlusion shadow, environment shadow projection and the dent in the ground. Then my partner gave me renders of the dust FX and the the shadow for the dust.
When putting all the layers together, we hit a couple issues, especially when trying to integrate the dust and it's shadow into rest, but my partner and I worked together and got it working after some trial and error.

Nuke node tree
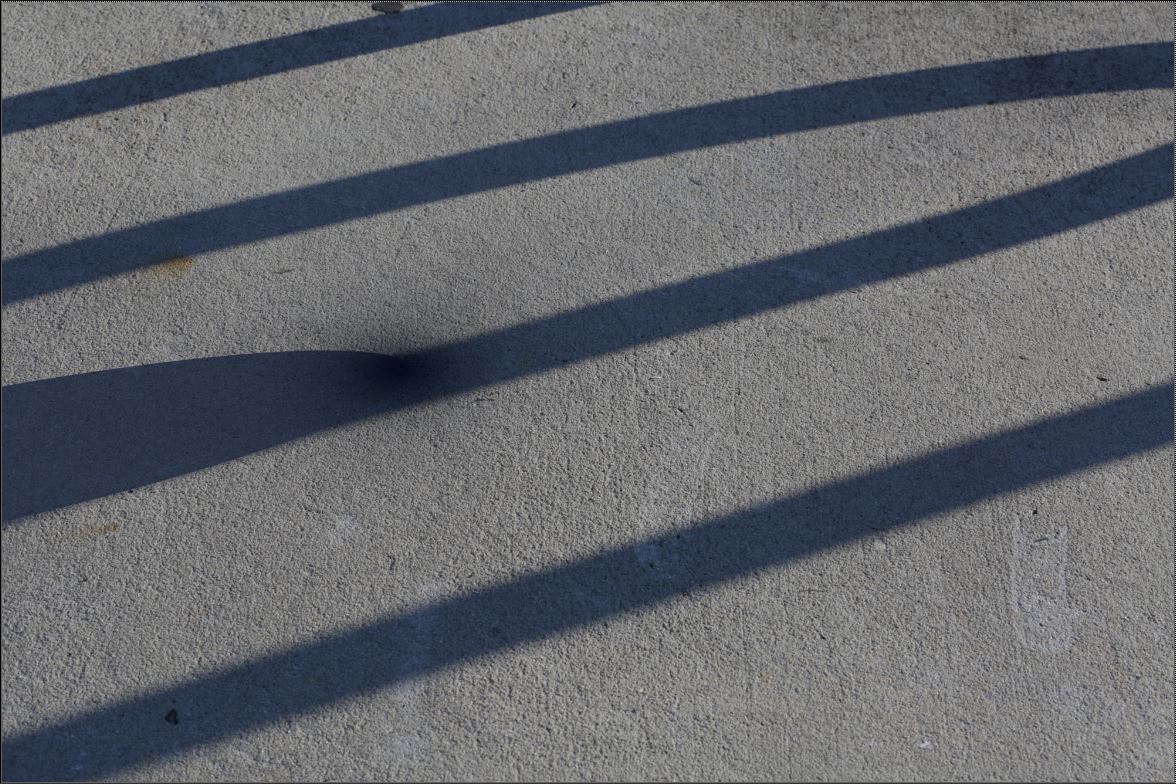
One of the challenges I came across when handling with the FX my partner used was how to integrate the dent in the ground with the background plate. Two problems arose: 1) There would be a shadow in the dent 2) The ground texture would warp inside the dent as well. I thought I could use the same key light shadow layer that I was using for the ball, but when I tested it out it wasn't capturing the whole shape and just didn't look like a dent. So I kept the key light in the layer when I rendered out the section of the ground and it captured the shadow nicely. With the warping texture, I knew I couldn't use the same projection I was using on the ground plane because the texture wouldn't follow the curves of the dent. So I did use the same background plate for my texture to try and keep it as consistent as possible, but applied an aiStandard shader to the section of ground and used the image as the bump map as well. I only rendered out the dent portion of the ground and merged it with the clean background plate, doing some color correction to try and match as close as possible.
Something that still needs to be addressed in this project is projecting the environment shadow onto the dust render so it acts properly when the dust moves through the shadow. For now, since it is a small section of the dust that moves through the shadow, we created a mask and slightly color corrected it so the dust got a bit darker when passing through. But I still think it needs to be done in the render for it to act correctly.
Week 2: More Experimenting with the Fish Eye Lens and PTGui
When I went out to take new photos for my background plate, I tried out the fish eye lens again to capture my HDR. This time I still took 4 images every 90 degrees around, but I also took one pointing straight up at the sky. I know that in theory, the fish eye should capture 180 degrees around including the sky straight up above. But since there was a significant amount of blank space at the top of my HDR from my first attempt over the weekend, I just wanted to see what happened when trying to stitch it together with a photo pointing straight above.
It turns out that the photo pointing straight up did fill in the missing space at the top. Now the same would have to be done for the bottom, but most of that would be filled with the tripod anyhow.
Since I am using the trial version of PTGui, it does not allow me to export a .hdr file. I thought I could get around this by stitching each exposure level together separately, exporting the JPG/TIFF image, and then bringing in those 7 stitched panoramas into Photoshop to create my HDR. But two problems arose when trying this out: 1) The two brightest exposure images could not be stitched in PTGui and prompted me to custom choose control points to help with the alignment but the image is so blown out it is hard to see anything at all. 2) When trying to merge the 7 (or in my case 5) images together in Photoshop, they are all slightly different coming out of PTGui and they don't align properly, giving this strange ghosting in a few spots.
Week 2: New Background Plate
During our first session on Tuesday, our mentors from the Mill (specifically Kyle Cody) suggested retaking my photos to use for my background image for project 1. He said that my match was close and I was capable of accomplishing that portion of the project, but that the photo I was using wasn't very interesting and that I should challenge myself with trying to use a more visually appealing photo. And I totally agree, my photo was kind of bland. So I went out a retook some photos. I may go back out again, but here is my other alternative for the moment.
I think this image more interesting in how the elongated shadows cover the width of the frame. The shadows are also a lot darker in comparison to the ground, giving it nice contrast.
Week 2: Experimenting with the Fish Eye Lens
This weekend while taking the photos for my background plates for Project 1, I was able to experiment with the 8mm fish eye lens that Professor Gaynor recently purchased, along with the pano-head rig for the tripod. This could be another alternative to creating our HDRs rather than relying on the photo of the chrome spheres. When first trying out this method I was a little worried at how well it might work because there was a strange blue halo surrounding the edge of each photo taken, as seen below.
After some trial and error, I was then able to download the free trial version on PTGui and try to stitch them together. It seems the blue halo around the lens is not actually an issue! With the free trial version it does cover your image with watermarks and you cannot export an HDR image, but other than those minor things it seems to work! The alignment isn't as exact as I would like it to be, so I think I would need to be more careful and precise when taking the photos.
Panorama image exported out of PTGui
When importing the panoramic image into Maya, I did notice that the very top and the very bottom of the HDR is black. To avoid this in the future, I think there should be a fifth photo taken with the camera pointing straight up above, and possibly another one pointing straight down below. This first experiment was taken with just four photos taken, covering the 360 degrees around. But it is now clear that at least 5 or 6 photos need to be taken to cover everything.
Week 2: Tweaking and Prep for first session with The Mill
After making my first attempt at matching the lighting, I made some adjustments and set up my render layers so I could bring everything into Nuke and comp my final image. I had to look back at old notes to jog my memory, but everything quickly came back to me once I got started. I broke the image out into direct light and fill light, and then direct shadow and occlusion show. Each pass is shown below, along with the final comp.
Direct Light
Fill Light
Direct Shadow
Final Comp
Overall I think I am getting there, but there still needs to be some tweaking. I think the shadow on the ball is still a bit harsh. Also the shadow on the ground needs to sharper.
Here is a comparison of my reference image to my match.
Reference
Match
Week 1: Camera and Lighting Match
After taking the photos, the next step was bringing them into Maya and start matching the camera angle and the lighting. The photo of the cube is used to match the camera inside of Maya, making sure to use the same focal length as you did when taking the photo. Then the grey ball photo is used to match the lighting, trying the brightness the same as well as the shape of the shadow.
Wireframe overlay of the cube to match the camera perspective, with a 70mm focal length.
The photo above on the left is my reference image of the grey ball, the image in the center is my lighting match of the grey ball in Maya, then my light settings on the right. Right now I think the shape of the shadow on the ground as well as on the ball is working, although I think the shadow on the ball could be softer. Also, the underside of the ball is a bit dark, so getting the bounce light from the ground in there will be important.
For the HDR, right now I am using a sphere with a surface shader as the dome around my scene. I think it would be worth trying the aiSkyDome as well, to see how it might be different. There are also some color management issues that need to be addressed as well.
I also did a block out of the rolling ball animation to get a feel of how the ball should move through the space.
Week 1: Photography for Project 1
Our first project of the class is to integrate a CG ball into a background plate, rolling it through light and shadow. This weekend I took my photos, and they include the clean plate, the cube, the grey ball, and the chrome sphere to use for our HDR.
One of the challenges with taking these photos was waiting the weather to cooperate and trying to keep the sunlight consistent throughout each one. If its a cloudy day, patience is key!

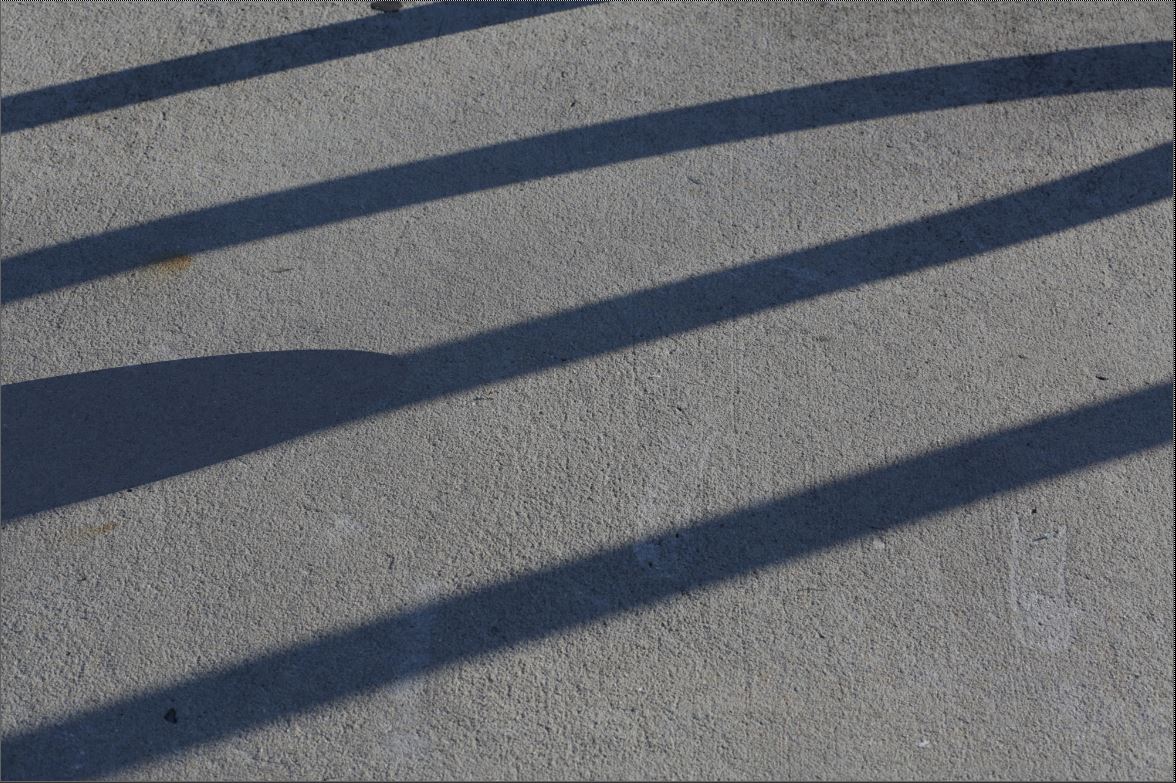
Clean Background

Cube

Grey Ball

Chrome Sphere HDR